I will be referring to these blog posts:
V1.5.0:
- Rat animation added
- Rat summon animation added
- Rat summon distance reduced (32px to 24px)
- Bug fixes to do with animation speed
- Return rat animation added
I will be referring to these blog posts:
V1.5.0:
 I have create an animation for when the rat is being summoned. Before the player would just stand in it’s idle state, but now this will play instead. Once finished the animation is frozen.
To apply this animation I first needed to alter the summoning conditions, so it will call for the above animation to be played:
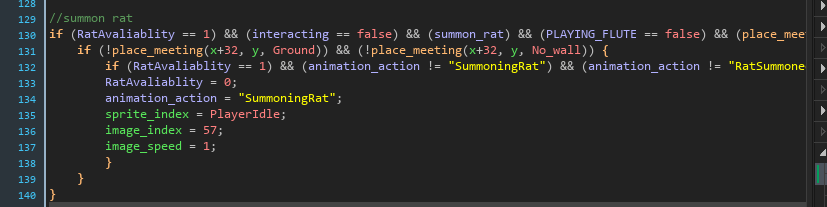

Above I split the code into two sections. The top code will set up the animation so it can be played and the bottom code reset the summoning animation, so the player looks like it is waiting to pick up the rat. The summoning animation code looks like this:
Only the top section of code has been used so far. The other two were final improvements, they weren’t necessary, but improved the animation a lot more.
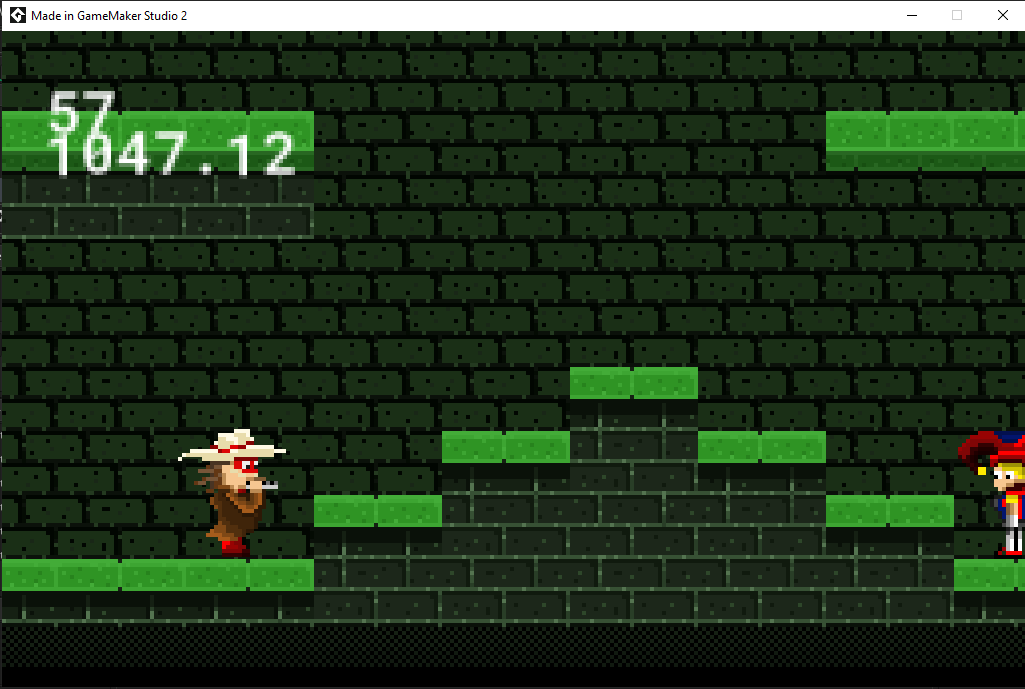
Here is what it looks like with the code implemented:

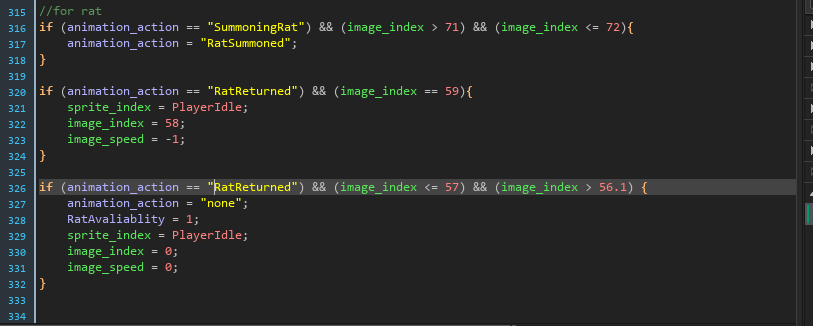
Now for the extra code shown. The extra code is for ending the animation sequence. To initiate the code, I altered the on collision with rat action in the player code:
 This simply just deletes the rat and changes a variable. The other code is currently useless, because I haven’t set up any scenarios for it just yet.
Anyway this brings me back to the code previously. With the new animation_action value. The animation is then looked for and once found, will start reversing the animation. After the animation hits a certain frame range, the animation will be set to the idle pose and the animation_action will be unlocked for the other animation code, so it can be reused.
For this animation I used this as a reference: https://www.pinterest.com/pin/815362707514474123/ (image below)

Even though the pixel art above is at a way higher resolution than 32×32, I only used it to analyse the leg movements. I didn’t add in all the small animation details of head rotation, moving tails and distortion of the body, because they aren’t that noticeable and is not that high on my priority list. If I have extra time I might add in the small details, but that’s very unlikely.
Anyway the animation I made was this:


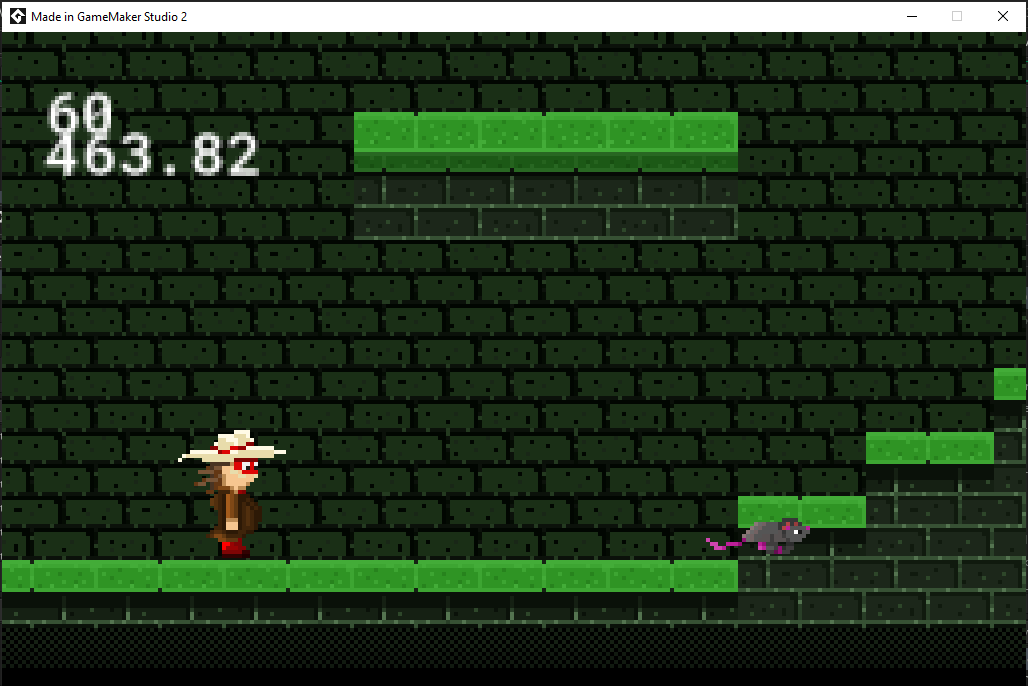
The one on the left is 12fps and the one on the right is 24fps. The frames are the exact same, but I altered the animation from 12fps to 24fps, because it looked way too slow for a rat animation. Here is a screenshot of it in game:
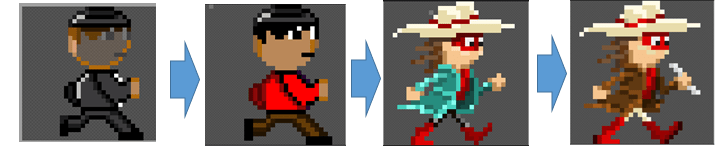
I am happy with the new design and the run animation. If you are wondering how it compares to the old version, here is a side to side comparison:


The reason I changed the graphics is because, it didn’t quite fit with the other designs and I haven’t updated in ages, so I decided it was justified to give it a new design.


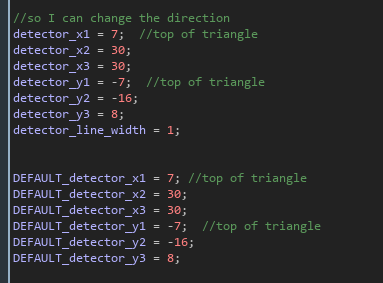
The new sensor has been altered to look more like a typical enemy sensor seen in games.
To create this I needed to create a script which would create the shape and change the position when needed:
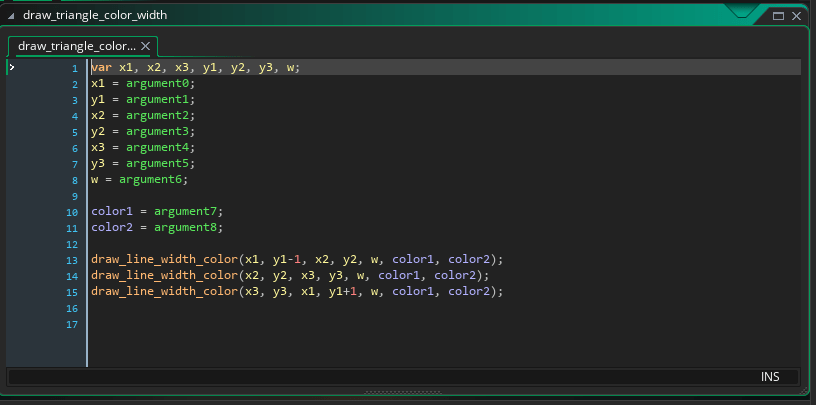
The reason I needed to create a script is because, the engine doesn’t have a draw_triangle_color_width function, it only has a draw_triangle function. This means that I could create a triangle, but I couldn’t alter the color or width.
I also made a few adjustments to the script above, which is y1-1 (line 13) and y1+1 (line 15). By adding this small adjustment, it made it look like the sensor was coming from the enemies eyes and not just a triangle in front of the enemy.
Once done I added the new code into the draw event on the guard:

The variables I’m using above are these (create event):
Once made I needed to update my sensor. This took quite awhile to figure out, because I didn’t know scripts could use arrays and I didn’t know how they worked. Anyway this is the inside the script:

There’s a problem with this script though, the code requires an array and the old sensor detector was a 2D Vector variable. To fix this I changed the default variable to an array with specifically 3 values. I then did this in the draw event:

The draw_triangle_detector works similar to the collision_rectangle function, but it requires 3 x and y inputs and not 2, doesn’t require a precise input, but it does require an array input and a variable storage.
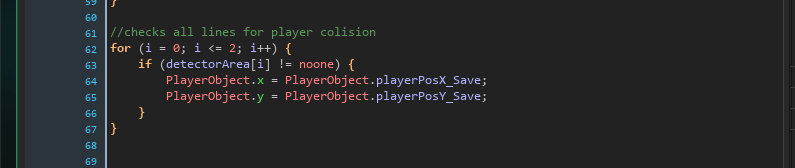
The shape a collision was complete, but I needed a way to detect it, so I add in a for loop in the step even of the guard:
With all this done, the question you might have is why do all this?
The answer to that is, that there is no function built in and with the script I can even add a rotation and change the direction if I altered the script further.
By creating the script instead of putting it in the code itself, I have improved the performance and reduced time taken, if I wanted the sensor on multiple characters. I can also use it for a melee attack.
I haven’t been organizing my game updates, like I have been with the graphics, so I have decided to combine the two, so I can keep track my easier.
V1.3.0:
V1.3.1:
V1.4.0:
V1.4.1:


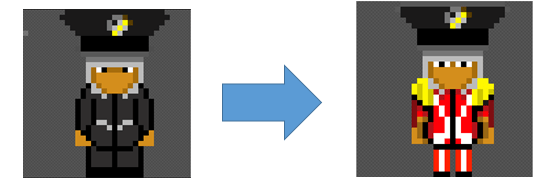
The screenshot on the left is the old version of the graphics and on the right is the up to date one. I recreated the graphics, because the guard was looking towards the user and not the player’s character. I also changed the size of the eyes and the way the character looks, so it would be more consistent with the other characters.
It may need some more adjustments, but currently it looks good for the game. Here is a screenshot of it in game:
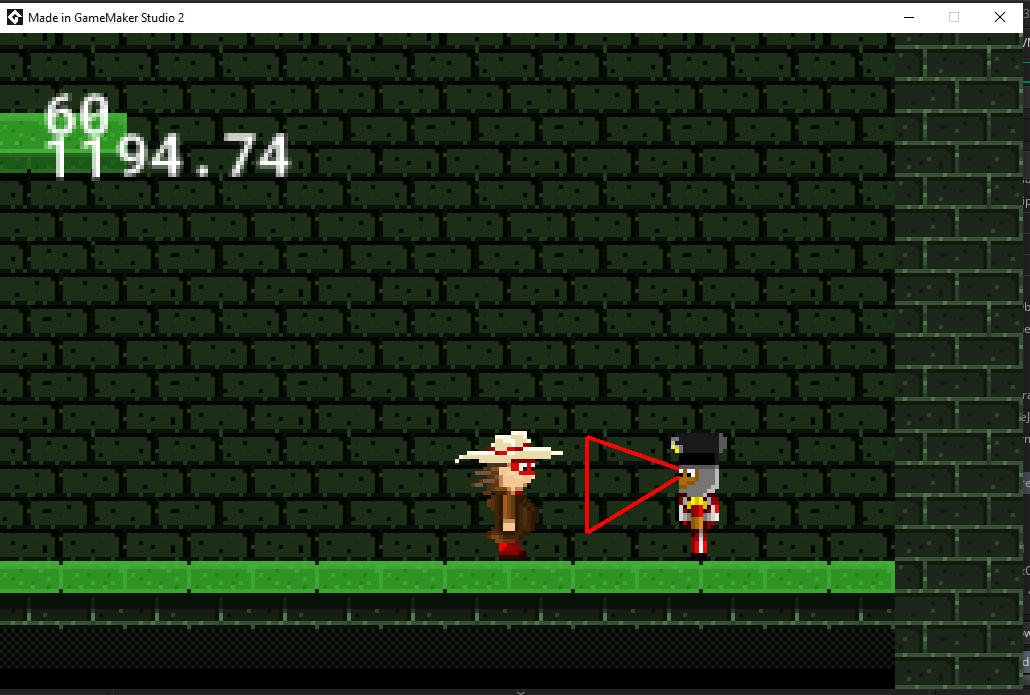
In the screenshot above, you may have noticed the sensor has been modified to be more visually appealing than a rectangle. I will talk about this more in the next blog post. Just a warning, the code maybe a bit confusing.
Planning and Organisation
Research
My research has developed throughout this project. At first I started researching about adventure and what it means. Then I started to delve into articles to learn about the age rating system.
I had an idea of a game at this point and started to look at other games that are similar to what I wanted like legend of Zelda Ocarina of Time and Oddworld. I am still looking at similar games and am continuing to develop my ideas.
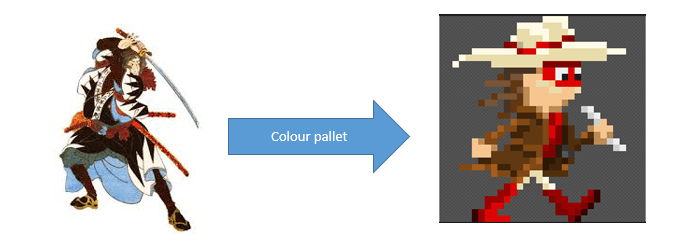
After I did some research, I started looking at 1900s Victorian and Japanese fashion. The look of the characters I’m using are a mixture of both fashions and personal looks:

Changes made
I made quite a few changes to the characters look and animation template throughout this project.
Evolution of Design:
Hero:
The look of the character was first just a doodle of a musician character without much research. The second character was a recolouring to make the colours look more of a japan like. The third look was a lot more research based and followed the look of the 1900s of the Victorian era and japan era. The final look was a recolouring and refining.
Guard:
The initial design for the guard was based more around the look of Japanese head gear and a 1900s Victorian suit. The badge is made from silver and gold to show who the leader is and that they’re wealthy. The symbol shown is a MiBox (not the android device, but an instrument I made up). A MiBox is an instrument that can combine two of any musical instruments.
The second look includes some colour that takes more inspiration from the Victorian era and includes a bit of shading.
Running animation template:
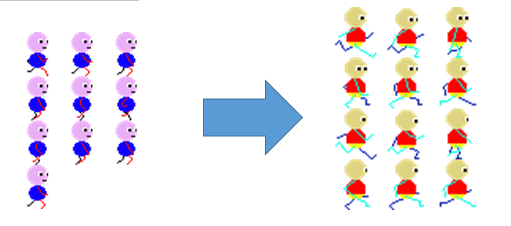 The first design was me recreating a gif of someone running in pixel art. The second design was me copying this design: https://www.pinterest.com/pin/256634878738225430/.
The second animation took a bit more time to finish, but was so much better. My problem before was I was looping the first half of the animation and not creating another half, which was pointed out by my tutor.
Tile-sets:
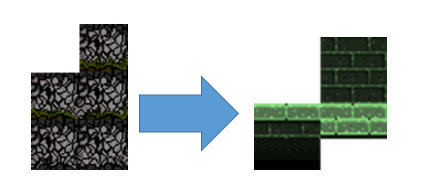
I first started creating a tile-set to meet the look I had in my head. I was happy with the result at the time, but didn’t realise how much better it could be. The recreation on the right was a more simplistic one, which was created to make the characters pop out more.
Preparation
My preparation for the pitch could’ve went better, but I believe I made a good effort. I wasn’t fully prepared for all questions asked and I didn’t have examples of everything.
My unique selling point of the game was using a flute mechanic for puzzles. I don’t know many games that uses a flute as a tool for puzzles, so the gameplay is very unique. The only game that comes to mind is Legend of Zelda Ocarina of Time.
Even though it is similar to Legend of Zelda Ocarina of Time, it is very different. My game has a rat and real time combat system. It uses the camera location to pick up a guard instance and then unlocks the flute system in that instance. The real time combat is where it approaches (not always) the player and they must react in time or they lose.
The game unique selling point worked really well with my target audience chosen, which was 7+. Children love music and so do most adults, otherwise Disney wouldn’t be so popular. This makes my theme of the game (music), such a good choice, because it hits a wide audience.
Development
Feedback
After presenting my game idea and showing what was currently made to my client, I was told that I needed more visual examples of gameplay. He also said, that making a mock-up of the game physically or digitally will save time in the long run.
The take away point was, to focus on the graphics more and less on the technical side. Even though it was great I could do the technical side, it could waste a lot of time. For example: If I created a function that isn’t needed, I would have to throw most/all of it away, which could’ve taken months to make, but if I needed to do the same thing with art, I wouldn’t lose as much time.
What I’ve learnt
I learnt that I was working too much like a software engineer, than the project required. I needed to focus more like a graphic designer than a software engineer. Meaning I need to focus more on creating graphics and gameplay ideas than systems.
I didn’t realise I acted and worked like a software engineer, until someone pointed it out. Sometimes I miss the most simplistic things.
I also didn’t realise how important it was to make mock ups of a game before starting to create/design it. I typically just come up with ideas through a conversation, then funnel them down until we/I come across an idea we/I liked. From there I start coming up with characters, graphics and functionality. I might start mocking up ideas before I start work making the game.
What I could do better and improving personal development
I could’ve planned better for the presentation and produced more visual examples of gameplay and concepts. This would help my personal development, because I can present my ideas more easily.
I should have researched more in-depth about how my character will look like, before I started creating concepts. This is because, the low research based concepts used up time I could have used for researching about how the character looks. This would have given me more time to create better concepts and code.
I occasionally didn’t manage the time I had well and will aim to improve this further forward. I did notice that jumping ahead occasionally helped to meet deadlines, through inspiring ideas and being productive while thinking.
By not focusing on creating mock ups, it has affected my productivity, because I don’t have much back to look on. I do have research, tutorials and articles, but having level designs and concept art may have been more useful. I do need a lot of research to make a good design choices, but I also need a good amount of concept art and level designs to make a good environment and graphics.
The screenshot above is the default stance of the flute animation. This stance is waiting for input from the player.
When implementing this animation I needed to create variables for the character, so I could tell the software what animation is being played, whether it should be reversed or not and to stop idle animation from being played:

I made three flute animation specific variables, so I can distinguish the flute animation introduction, whether the flute is being played and whether the first fame of the selected music note has been played.
To even get started on the animation, I needed a way to gather data from what note is being played, hence this:

With the data gathered, I made the introduction animation play:
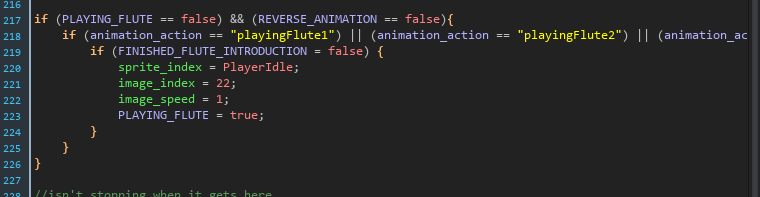
The code above makes sure the right sprite animation is chosen, is playing and is at the right starting place. Once activated, it gets locked until requested again.
Following on from this, I made the animation stay static when it gets to an idle stance:

If I did this, so I can tell when the intro animation is over and I can wait for a request, but the first time it already has a request.
Afterwards I let the animation play fully and applied a sound, which I removed from the guard music cues.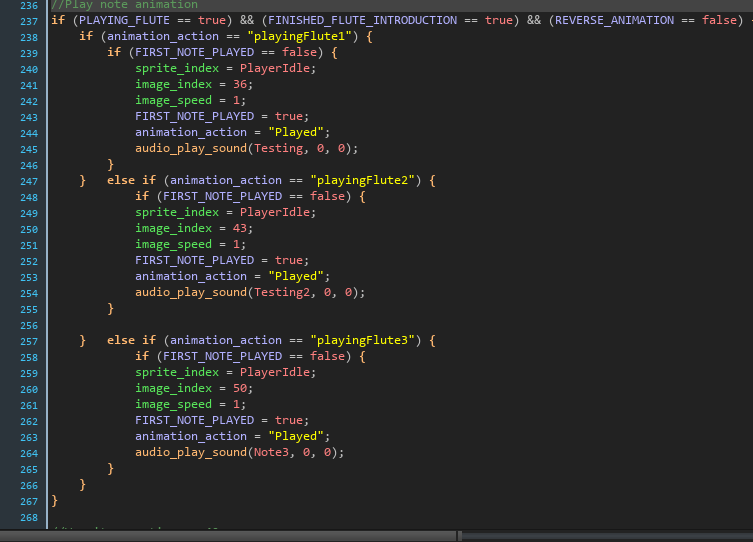
Once the animation reaches it’s last frame, I reset the animation to the default stance, to wait for an input:

With this code, the animation was finished for all 3 music notes, but I needed to restrict other animation from playing, while the flute was being used and I needed away out of the cycle.
To start with I restricted all animation non-flute related by adding in a restriction, here’s an example:
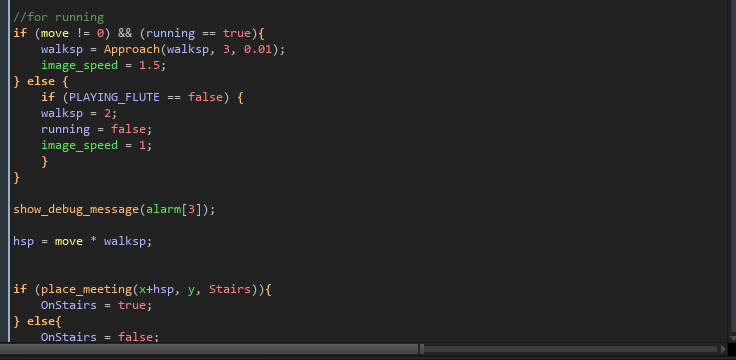
There isn’t an animation in this screenshot, but it does affect animation speed when a player is running and standing still. I may need to add a different or more restrictions if I add any more animation in this, but currently it works fine.
After the restrictions were put in, i needed a way to exit the animation cycle, so I coded this:

The above code checks if the right or left movement keys are being pressed. If so it then checks what animation is being played. If a flute animation is being played, it checks to see if it has reached a certain point in the animation. If is has reached the required animation frame, it sets the image index and reverses the animation. After a timer is up, it stops animation from reversing.
I am proud with what I have achieved and shocked you read this far.
I was having some probably with the code and they were animation playing too long, animation not stopping and animation not playing. All these were due to me not putting in restrictions to stop other animation and me not considering that animation gets priority of code.
Used videos:
https://www.youtube.com/watch?v=JpS3yslhu0Y (Spine and GMS2)
https://www.youtube.com/watch?v=eXIuizGzY2A (Unity skeletal animation for 2D)
https://www.youtube.com/watch?v=JkcJ5bjGPsg (UE4 skeletal animation for 3D)
What is a skeletal animation?
Simply put, skeletal animation uses a skeleton mesh for all animation, which is built up of different bones. The skeleton bones are transformed in real time (location, rotation, etc.) using simulated weight and relationships to warp the textures given to perform a task. This is how rag-doll physics works.
Main content
I was considering to use skeletal animation in my game, because it would help with the animation process, because I am slow at the animating side. With this in mind I looked at the software called, “Spine”. I found out Spine is a really good software for skeleton animation for GMS2, however it costs quite a bit (£80-£300).
I kept this software in mind, but I researched deeper and came across Unity. I was somewhat knowledgeable of Unity, but didn’t know it had it’s own skeleton system. Even better than a skeleton system and a game engine editor in one, is that it is completely free, as long as you don’t make more than £80k annually (approx).
I looked further into Unity and the code looks more simple than GMS2. I’m not sure of this, because I haven’t tried out Unity in a while and last time I did try it, I only did a small practice project in 3D.
To give some praise to GMS2, it is better than Unity if you aren’t a programmer, because it doesn’t require code, but Unity does. It is also better for quick prototyping, because you don’t need to code to get a basic setup.
After researching into skeletal animation in games and how it worked, it seemed like it would be a little time consuming to setup complicated characters, but it seemed much, much quicker to make multiple animation. On the other-hand when I looked into 3D skeletal animation for UE4, it seemed more complicated. The reason it seemed more complicated is that each skeleton requires more bones than a 2D version, which makes it much longer to animate. The animation process seems to be best done in Blender, because of the built in 3D animation.
Manual vs Skeletal animation:
Skeletal animation seems to take some time to setup, but once setup it looks like the animating process is much quicker. It seems to make animation easier to someone like me, who is good at programming, but not so much animating, It also seems to be a lot quicker to edit the animation, for example: The torso is pointing in the wrong position.
There is a downside to skeletal animation and that is shading. You can add materials to reflect lighting or stop it, but it is easier to get light to reflect exactly the way you want it by manually drawing it.
Drawing manually is also better for inexperienced programmers, because you need to understand exactly how the character bones will move and how much weight they should gave.
Ending thoughts:
I am considering on making a 2D game next year that uses skeletal animation, so I can create an equipment system that show on the player and be able to create new animations with ease. I will have to reduce the graphical look of the character, because I don’t know how to add shadowing, but this may help to apply a shadow/lighting look:
https://www.youtube.com/watch?v=fwyAoE_uMFo

The notes I chose wasn’t all what I wanted to implement. The final note played is an upside down Crochet music note. I did want to use a Treble Clef, but couldn’t make it small enough for the animation. If I made the Treble Clef note fit it would be offset or squished, but to big and it would get cropped in the animation.
I will use this animation of 35 frames to get out the flute, put in back (by reversing animation speed) and to play all 3 notes. I may not use all the notes, but I will definitely use one of the 3.
So in this one animation, I can use it for 5 different animations. I can do this through clever coding to make it play through certain parts of the sprite animation.
