Update: Jesty Running

Above is the player interacting with Jesty the Jester and then her running away after the conversation is over. This will be used when the player has ended their first encounter with her in the dungeon. I may reuse it at the end of the first level as well.

This is what the screenshots are built of:
Legend of zelda ocorina of timeJestyTheJester_runningCode

The sprite-sheet makes up the running animation and the code, sets the animation, direction moving and whether the character should be moving.

The if (instance_exists(JestyTheJester)), is checking if the object is in the room. If it is, then it runs the code. This is done, so the game won’t crash if the object doesn’t exist.

Update: Guard Detection


GuardDetection_Code

Above is the code to create the detection area and trigger area.

It was simple, but I needed to learn how to draw a rectangle on screen and not delete the object while doing so. Then how to apply collision.

I used the new detectorArea function on the Guard_Redisgner obect in a place_meeting statement, which looks for the detectorArea, instead of the Object.

CheckingIfPlayerIsColliding

This is it in action:


Update: Prison Cell Design

prisonCell_Design1

Above is a 32×32 pixel prison cell design. The Outside of the cell will have at least a 64×64 pixel look and the inside will be at least 128×64 pixels.

I have been working on the running animation for Jesty the Jester, but I wanted a break temporarily, so I decided to make a design for one of the prison  cells where Jesty the Jester would be.

I changed the background wall colouring a bit, so it is more darker and plan to do so with the main tilesets I’m using.

I wanted to make the tilesets more darker, because I wanted to get a better feeling of being in a dungeon and to show the times are more dark.

I also have decided to start to make the graphical theme more retro style, which means making more simplistic textures and focusing on colours to show where the player is. Examples: Blue means water, greem means jungle or somewhere dirty, yellow means desert and orange meaning somewhere hot.

I am thinking off making the first 5 levels or so all green and dark coloured theme. Then I am thinking of altering the textures to be more bright, but still green. Once the player is almost near the ground, I am considering to alter the bricks once again to inherit the colours of dark orange and green. Green, because you’re still in a dungeon and dark orange to resemble the evening time.

Then once the player has reached the surface, I am thinking of making the scenery colour palette to an evening type of theme. The characters will stand out, but the scenery won’t as much.

Update: Hero Running and Animation Done and New Character Design

HeroRun0_strip12.png

The enlarged sprite sheet above is off the hero run animated. I made the coat move with the character when he is running. This wasn’t necessary, but made it look better.

JestyTheJester_BigScale_V3

This is Jesty the Jester. She is quite peculiar on how she acts. She can be happy and over the moon one moment, then miserable and sad the next. You will first encounter this character in level 1 in a prison cell.

Development of design:

My first design was using the character of Rubella and Tristis from Child of life and jester designs from the 1900s-2000s.

The second design I changed the shirt colour and preposition one of the hat bells. This was because, it didn’t look quite right in the game.

The final design was changing the torso, so it looked more feminine. Basically reduce the stomach size and add some breasts.

Update: Cutscenes V1.0.0 (technical)

Cutscene_blank_variables

Cutscene_camera_movement_V3


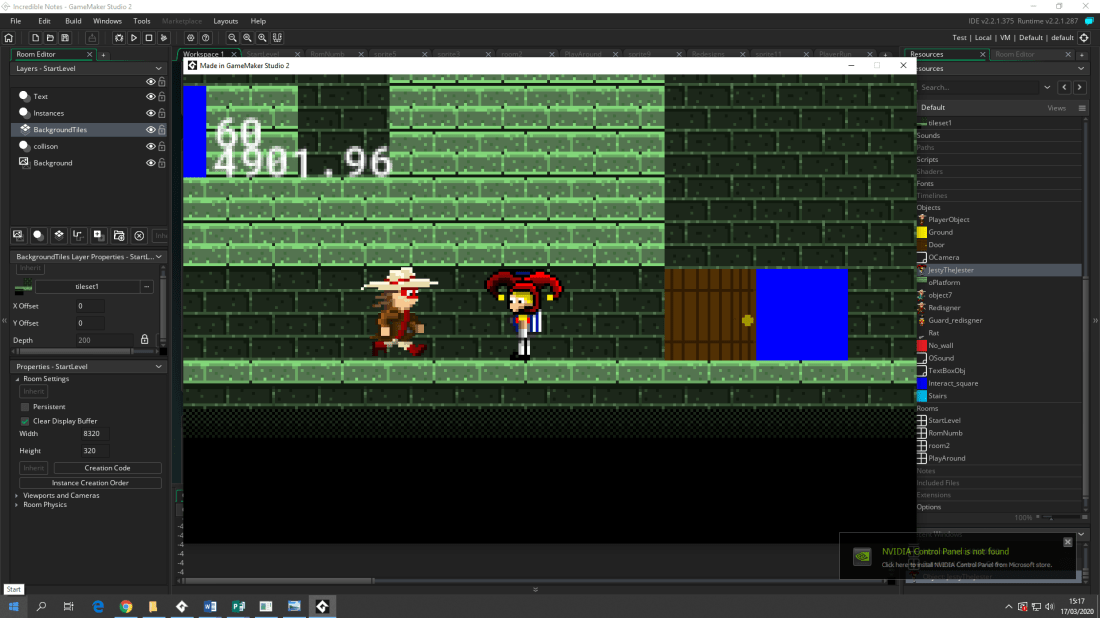
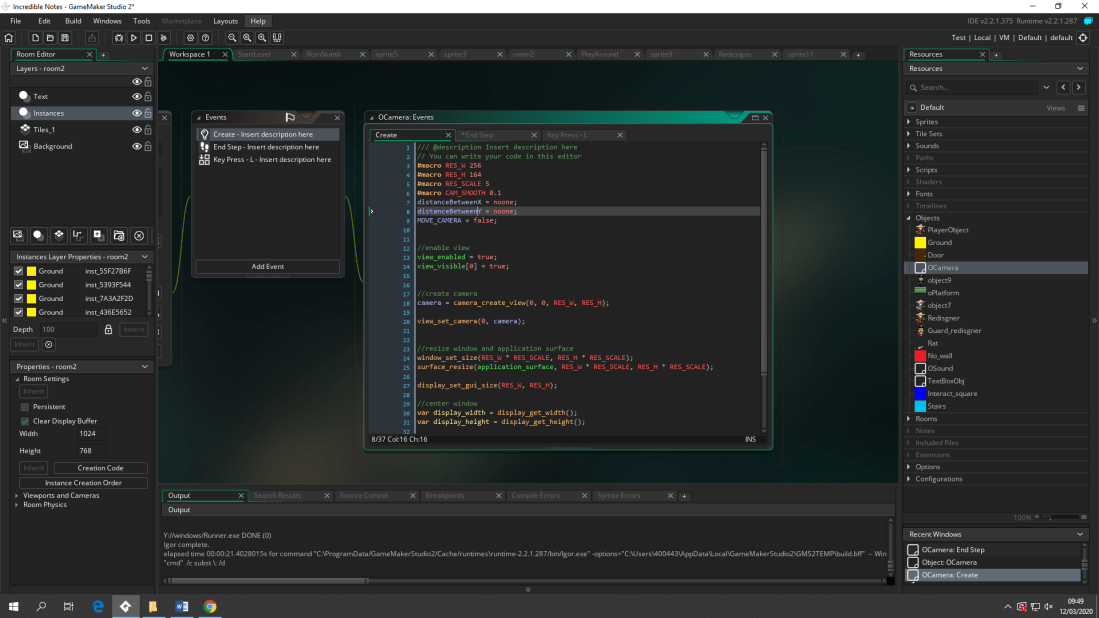
The above screenshots are of the code used and the variables used; camX, camY, targetSxeneX, targetSxeneY, distanceBetweenX and distanceBetweenY.

The code is getting the current camera and target x and y positions. Then working out the distance between the camera and the target. It then checks if it needs to check if it needs to takeaway or add on to the camera destination to close the gap.

I only figured this out when talking to someone about the problem and realise the solution was an equation I was using, but not using in the correct way.

Before I used:

if (camX > targetSceneX) {

camX -=1

}

else if (camX < targetSceneX) {

camX +=1

}

This worked great for whole numbers, but when it came to  decimal points, it kept flipping back and forth. I created an infinite loop. Example: +1 would make a 1 pixel difference spot on, but a 0.1 pixel difference a 0.9 difference. A change of 0.01 per tick would make it always correct, but that would’ve been so slow.

On the other hand the new equation:

if !(1 >= distanceBetweenX) {

camX += 1;
}
else if !(-1 <= distanceBetweenX) {
camX -= 1;
}

Checks the distance between point A and B, if the distance is not lesser or equal to one, then add one. Then the complete opposite for taking away.

This will check if the distance is within 1 to 0.01 or -1 to -0.01, otherwise it will close the gap.

Here is an example of it in play:

Cutscene_before_startingCutscene_camera_movingcutscene_ending


The only problems with it so far is, that I can’t make huge speed jumps like 32 pixels per tick, because the camera will have a max offset of 32 pixels and I need to make rooms a bit bigger, so I can hide the black background.

Analysis: Naming Conventions/User Friendly Code

Used links:

https://www.youtube.com/watch?v=Sm0wwmEwqpI

https://dzone.com/articles/important-tips-to-write-clean-code-in-c-1


Analysis:

I watched the video above about PEP-8 (Python) naming conventions and read an article above about C# friendly user code to get an idea of how to be more user friendly (other programmers not clients).

The information I gathered from analyzing both sources were the following:

  • All variable names should use the camelCase naming convention. You can also use the PEP-8 naming convention, which separates each word with an _ instead of a capital letter.
  • Class names should always use the PasacalCase.
  • All variables that you don’t want changing should be in capital letters.
  • All names used as a variable, class or any other purpose, should be meaningful.

I have always made the names meaningful, but I didn’t know there were naming conventions for different types of variables. I will start using these naming conventions from now on.

Update: Dialogue System V1.0.1

Dialogue_system_V1.0.1_BlankArraysDialogue_system_V1.0.1_FillingInArrays

I have improved the performance once again.

The first thing I did was create a blank array in the character and then I put all the arrays for the level into the room creation script (didn’t know there was one until recently). I then went to another room and did the same thing with the arrays, except I used different instances.

This now lets me reuse already existing array slots for when the object is no longer there, because the player transferred rooms. Meaning I can save 1000s of lines of unused code across multiple levels.

With this enhancement I save 3 lines of code per dialogue box use in each room. Example: 2 rooms 10 dialogue boxes. I would save 30 lines of code. If I was making a full game, I could have 25 levels with 10 dialogue boxes each, meaning saving a grand total of 720 lines of code. A small decrease, but a decrease nonetheless.

Literally all a user needs to do now is add in a Interact_square, double left click it, change all values to what they want, aka text shown and how many pages. Then open the creation code for the current room duplicate the top line of code, grab the instance code from the object they just placed and replace the = value to the new instance code. Then the user will have a full working dialogue system.

They can append the code easily as well with the notes I’ve left them.

Update: Reasoning for previous post (technical)

Blog post referring to: Update: Dialogue System V1.0.0

I just wanted to say that I know I could’ve just copied the function and change the instance code, but I had a valid reason on why I went through the effort of creating an array that worked with a function. Short version is that it improved performance and usability.

The way I did it required an additional 5 lines of code to get the system running, however if I wanted to expand the amount of dialogue boxes, I would only need to add 4 lines of code each time, instead of 33. That allows me to create 8 dialogue boxes for the space of one.

This may not sound like a lot, but if I think of it on a large scale, let’s say 10 dialogue boxes. The total lines of code needed to create 10 dialogue boxes the lazy way would be 330, but the efficient way (the way I did it) would only take 74 lines of code. Meaning it cost only 22.5% of the space for this example.

Results may vary depending on how much dialogue you want per box, but this is a rough estimate.

For usability of the code, it has also gotten easier to explain without being there and is less time consuming per additional dialogue box added.

I might try to improve the simplicity and performance of the code later on, but for now it works amazingly for what I want. I was thinking of reusing instance id in different rooms, but that isn’t allowed, because it would create bugs. To get around this I am thinking of using the Instance_change() command to swap instances over and swap the valuables, however I’m not sure if it works like that.

In short I have done an amazing job to reduce the code needed, but I think it is possible to reduce it further by reusing instances, but I don’t know how to do that currently and it could mess up the system.